How to Create an Item
Item creation is one of the most important SeeBiz Inventory functions. In just a few steps, it lets you add all kinds of items.
Access Item Creation
There are multiple ways to access the item creating page.
Method 1: Click on the “All items” tab on the Feature Navigation Sidebar. When you don’t have any items added in SeeBiz Inventory, you’ll see two buttons; “Create Item” and “Import Items”. Click on the “Create Item” button to add new items to your inventory.
Method 2: Click on the “+“ icon next to the “All Items” tab to create an item.
Method 3: If you have already created some items, click on the “+ New” button at the top-right of the “All Items” section to add new products.
Adding an Item
After entering the item creation window, you’ll be able to add each and every detail about your product.
Here’s a complete description of the fields that you must fill in order to create a new item:
Fields | Description |
Add Images | You can add the images of your product here. |
Item Name | Enter the name of the product you want to trade. |
SKU | Add the unique numerical identification number for your Stock Keeping Unit or generate a new one by clicking on “Generate SKU” under the bar. |
Unit | This is where you add the unit of measure for your stock. Here, you can choose between kg, piece, and litre. |
UPC | You can specify the Universal Product Code i.e. the type of code printed on retail product packaging to aid in identifying a particular item |
MPN | Here, you can add the Manufacturer Part Number of the item. They are used to uniquely identify a specific item among all products from the same manufacturer. |
EAN | You can specify the European Article Number (also known as International Article Number)of the product here. This is a standard describing a barcode symbology and numbering system used in global trade to identify a specific retail product type, in a specific packaging configuration, from a specific manufacturer. |
ISBN | Here, you can add the International Standard Book Number (ISBN) of your stock. An ISBN is essentially a product identifier used by publishers, booksellers, libraries, internet retailers and other supply chain participants for ordering, listing, sales records and stock control purposes. The ISBN identifies the registrant as well as the specific title, edition and format. |
Manufacturer | You can add the manufacturer’s name or company here. |
Brand | Here, you can enter the product’s brand name. |
Description | Use this space if you want to add some extra information about the product. |
Dimension | Enter the dimensions of the item in centimeters. |
Weight | Enter the weight of the item in kilograms. |
Sales and Purchase Information
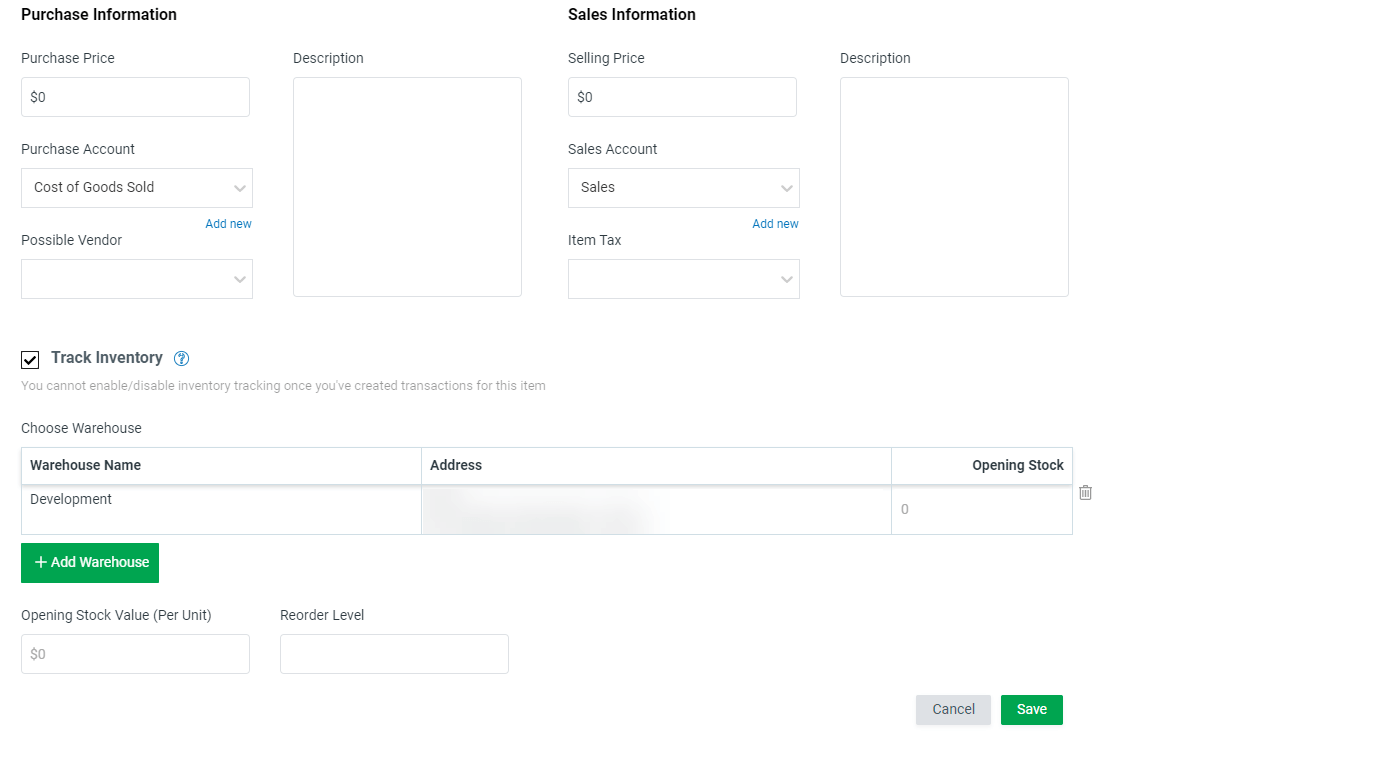
Here you can add the sales and purchase information about the item.
Fields | Description |
Purchase Price | The price at which you have purchased that item. |
Purchase Account | The expenses recorded in the purchase account may include the cost of goods sold, bad debt, marketing cost, office cost, or some other cost. |
Possible Vendor | Select a possible vendor from whom the item can be sourced from. |
Description | Here, you can add some description about the purchase of the item. |
Selling Price | The price at which you want to sell the item. |
Sales Account | This account will be used to record cash and credit sales transactions resulting from the sales of goods. |
Description | Here, you can add some description about the sale of the item. |
Item Tax | You can add or select the applicable item tax. |
New Purchase or Sales Account
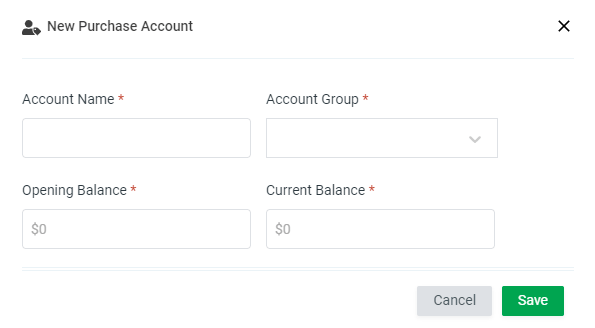
If a purchase or sales account you want to associate with the item does not exist, you can create it on the spot. Here’s how:
Fields | Description |
Account Name | Enter the name of your new sales or purchase account |
Account Group | Add the group to which your new sales or purchase account belongs to. Make a new one if you have to. |
Opening Balance | Enter the amount of money in the account at the time of its creation |
Current Balance | Enter the current amount of money in the account |
You can either select an account group or create a new account group. Here’s how:
- Select the “+ Add New” option from the drop-down menu.
- Add an appropriate group name for your sales or purchase account.
- The system will auto-select the group type based on whether you are creating a purchase account or a sales account.
Tracking Inventory
If you want SeeBiz Inventory to track this item’s stock based on the sales and purchase transactions, select the “Track Inventory” feature.
Here, you’ll see your company name and address as warehouse name and address.
- You can enter the opening stock of the item at this warehouse.
- You can also add another warehouse by:
- Clicking on the “+Add Warehouse”.
- Select the warehouse from the drop-down menu.
- Enter the opening stock of the item at this warehouse.
- Add the opening stock value (per unit) of that item.
- Enter Reorder Level to track your stock.
- Click on the “Save” button to finish creating a new item.


